Enrolling custom keys for secureboot on a Super Micro X11SCL-IF motherboard
#HomelabAfter a Raspberry Pi A, a Banana Pro and a x86 mini PC I recently purchased a Super Micro X11SCL-IF motherboard for the next iteration of my homelab.
This document covers how to enroll your platform keys in the UEFI of this motherboard and use secure boot with Arch Linux. First start with some basics:
What is …
UEFI: The Unified Extensible Firmware Interface is an interface specification for the communication between the operating system and the firmware and replaces the legacy Basic Input Output System interface. The term UEFI is often used for both the specification and its actual implementation. As advantages over the legacy BIOS interface, the UEFI specification includes among other things network capabilities, support to boot from disks larger than 2 TB and the ability to store data in (non-volatile) UEFI variables.
UEFI Application: An UEFI application, also EFI application or EFI binary is a special binary, that can be loaded by the UEFI firmware and uses functions provided by the firmware to perform various tasks.
Secure Boot: Secure Boot is a feature of the UEFI specification that detects tampering of the bootloader or the kernel of the operating system by validating their digital signatures before running them.
IPMI: Intelligent Platform Management is a standardized interface for platform management running on the Baseboard Management Controller. The BMC is a micro controller embedded into the motherboard and always powered on. It’s features are hardware monitoring and remote manage like powering the system on and off or mounting ISO images. The term IPMI is often used as a synonym for the web interface of the BMC.
Creating the custom keys
Relevant keys for secure boot are stored inside UEFI variables in the form of EFI Signature Lists. An EFI Signature Lists can contain either hashes or RSA signatures of hashes or public keys. Note that mixed entries, such as one hash and one public key are not possible in a single EFI signature list.
UEFI uses the following variables for the secure boot process:
PK (platform key): The platform key is the top level key in the secure boot process. The variable can either be empty or hold an EFI Signature List with exactly one entry - the public half of the platform key.
KEK (key exchange key): The variable KEK holds a EFI Signature List with
keys to update the signature database or sign binaries.
Changes to the variable KEK must be signed with the platform key.
DB (signature database): The variable DB can contain multiple EFI Signature
Lists.
Therefore the signature database can hold public keys as well as hashes and
signatures.
An efi binary will be booted if it is signed and the signing key or the signature
itself is in the signature database or the hash of the binary (signed or not) is
in the signature database.
Changes to the variable DB must be signed with a key from the KEK variable.
DBX (forbidden signatures database): The variable DBX can contain multiple
EFI Signature Lists.
If the signature, signing key of the signature or hash of a binary is in the
forbidden signatures database, booting it will be denied with secure boot
enabled.
Changes to the variable DBX must be signed with a key from the KEK variable.
Various guides in the internet, like Microsoft’s Windows Secure Boot Key Creation and Management Guidance or the UEFI Specification in Version 2.9, Section 32.3 recommend 2048 bit keys, however I experienced no problem with a public key size of 4096 bit of the X11SCL-IF board. Generate the keys with
openssl req -newkey rsa:4096 -nodes -keyout PK.key -new -x509 -sha256 -days 9125 -subj "/C=DE/CN=PK CA 2022/O=kalehmann/" -out PK.crt
openssl req -newkey rsa:4096 -nodes -keyout KEK.key -new -x509 -sha256 -days 9125 -subj "/C=DE/CN=KEK CA 2022/O=kalehmann/" -out KEK.crt
openssl req -newkey rsa:4096 -nodes -keyout db.key -new -x509 -sha256 -days 9125 -subj "/C=DE/CN=DB 2022/O=kalehmann/" -out db.crt
Here openssl req is invoked with the following options
-newkey rsa:4096creates a new certificate and private key using RSA and a key size of 4096 bits.-nodesdo not encrypt the private key using DES. That means no password will be asked when accessing the private key.-keyout {name}.keywrite the private key to{name}.key.-new -x509outputs a new self signed certificate.-sha256use SHA256 hash function to sign the certificate.-days 9125certify the certificate for about 25 years.-subj "..."the subject that identifies the entity associated with the public key. Has the form/type0=value0/type1=value1/.... Fields are for exampleCfor the country,CNfor the common name andOfor the organization.-out {name}.crtoutputs the certificate to{name}.crt.
Manually enrolling the keys in the firmware from a USB stick requires certificates in the DER format. To convert the certificates from PEM to DER use
openssl x509 -outform DER -in PK.crt -out PK.der
openssl x509 -outform DER -in KEK.crt -out KEK.der
openssl x509 -outform DER -in db.crt -out db.der
Certificates in in EFI Signature Lists are always accompanied by a GUID to identify the owner of the signature. Let’s start by creating a random GUID to identify the key creator:
uuidgen --random > guid.txt
Now use the cert-to-efi-sig-list command from the efitools package to create
EFI Signature Lists from the certificates:
cert-to-efi-sig-list -g "$(< guid.txt)" PK.crt PK.esl
cert-to-efi-sig-list -g "$(< guid.txt)" KEK.crt KEK.esl
cert-to-efi-sig-list -g "$(< guid.txt)" db.crt db.esl
Finally generate authentication headers to update the variables. The authentication header for platform key updates is signed by the platform key itself, all other headers are signed by the next higher key:
sign-efi-sig-list -g "$(< guid.txt)" -k PK.key -c PK.crt PK PK.esl PK.auth
sign-efi-sig-list -g "$(< guid.txt)" -k PK.key -c PK.crt KEK KEK.esl KEK.auth
sign-efi-sig-list -g "$(< guid.txt)" -k KEK.key -c KEK.crt db db.esl db.auth
The next step is to boot a Linux system on the board to enroll the keys.
Accessing the web interface of the BMC on the X11SCL-IF board
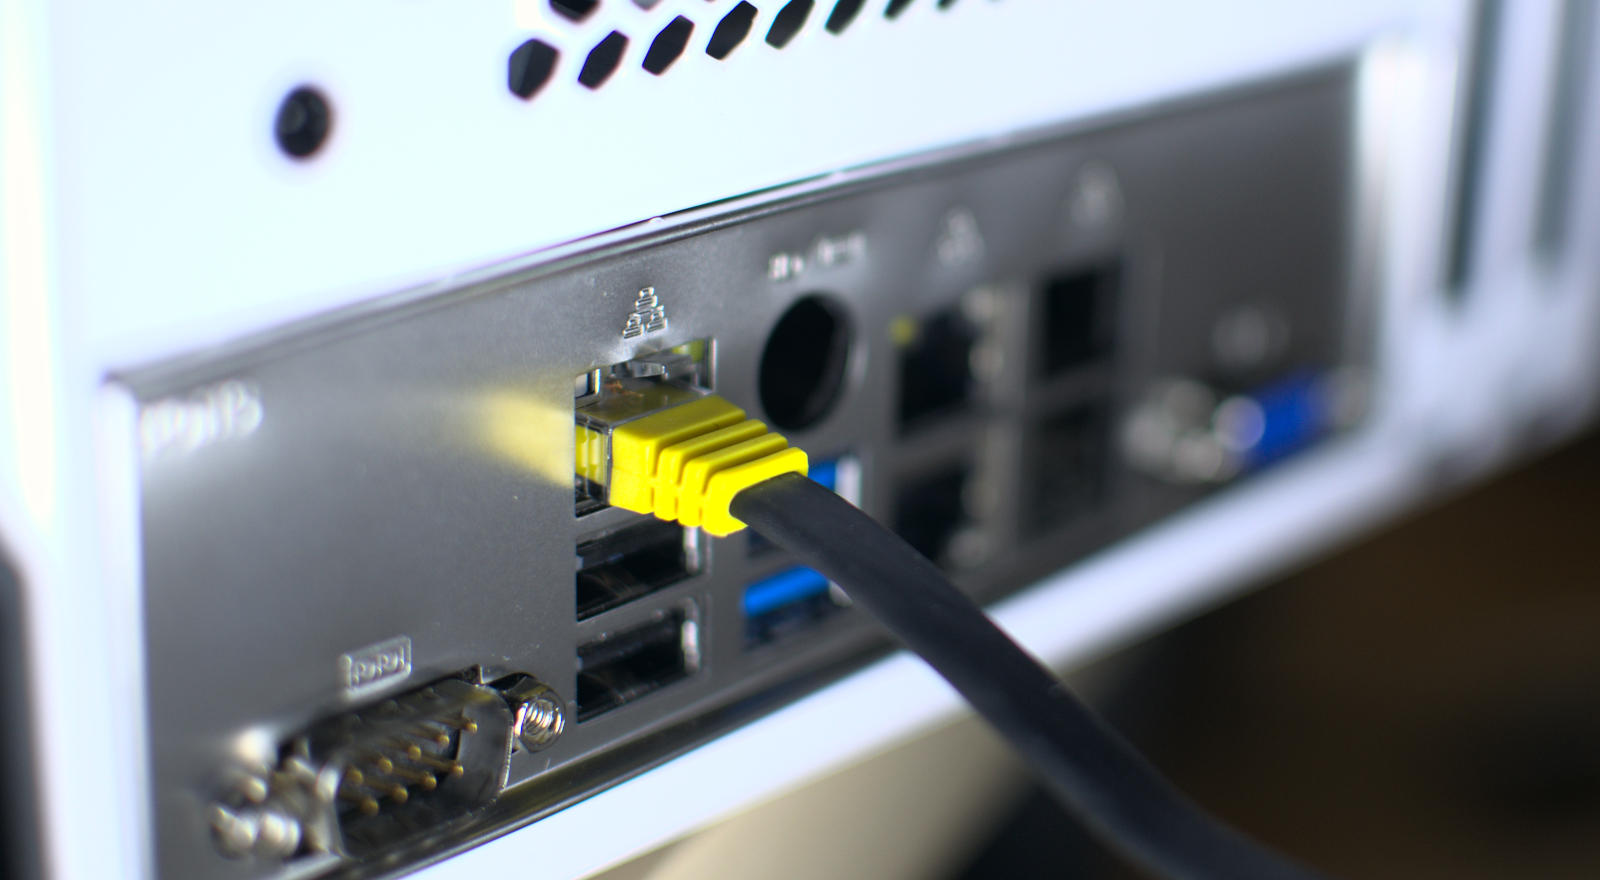
First connect the dedicated BMC IPMI LAN port to your local router. This dedicated port is located right above the serial port.
The IP address of the BMC can be identified with nmap.
Run
nmap <your-cidr> # e.g. nmap 192.168.178.1/24
and watch out for a result similar to
Nmap scan report for 192.168.178.129
Host is up (0.013s latency).
Not shown: 995 closed tcp ports (conn-refused)
PORT      STATE SERVICE
22/tcp    open  ssh
80/tcp    open  http
443/tcp   open  https
5900/tcp  open  vnc
49152/tcp open  unknown
Now the web interface can be accessed under its ip address in the browser, e.g.
https://192.168.178.129.
The certificate warning can only be ignored as its Common Name (CN) is “IPMI”
and all modern web browsers convert hostnames to lower case - so even a hosts or
DNS entry would not help.
However a custom certificate can be rolled out later.
The default user is ADMIN and for older boards the factory password was also
ADMIN.
Newer boards a configured with a random factory password.
This password is printed on two stickers, one directly on the motherboard and the
other on the protective chassis of the CPU socket.

More information about the stickers and the password is available in the Super Micro BMC Unique Password Guide.
Activate the license
Some really useful functions like mounting virtual media from the web interface require the additional activation of a license. Fortunately Peter Kleissner already reverse-engineered the algorithm to generate the license key. Short summary: Gather the MAC address of the dedicated BMC LAN port and run
echo -n '{your mac address}' | xxd -r -p | openssl dgst -sha1 -mac HMAC -macopt hexkey:8544E3B47ECA58F9583043F8 | awk '{print $2}' | cut -c 1-24
where {your mac address} is replaced with the MAC address (in lower case and
bytes separated by colons) to generate the key.
Synchronize the time
Go to Configuration -> Date and Time.
There enter two NTP servers of your choice, your time zone and then proceed
with Save.
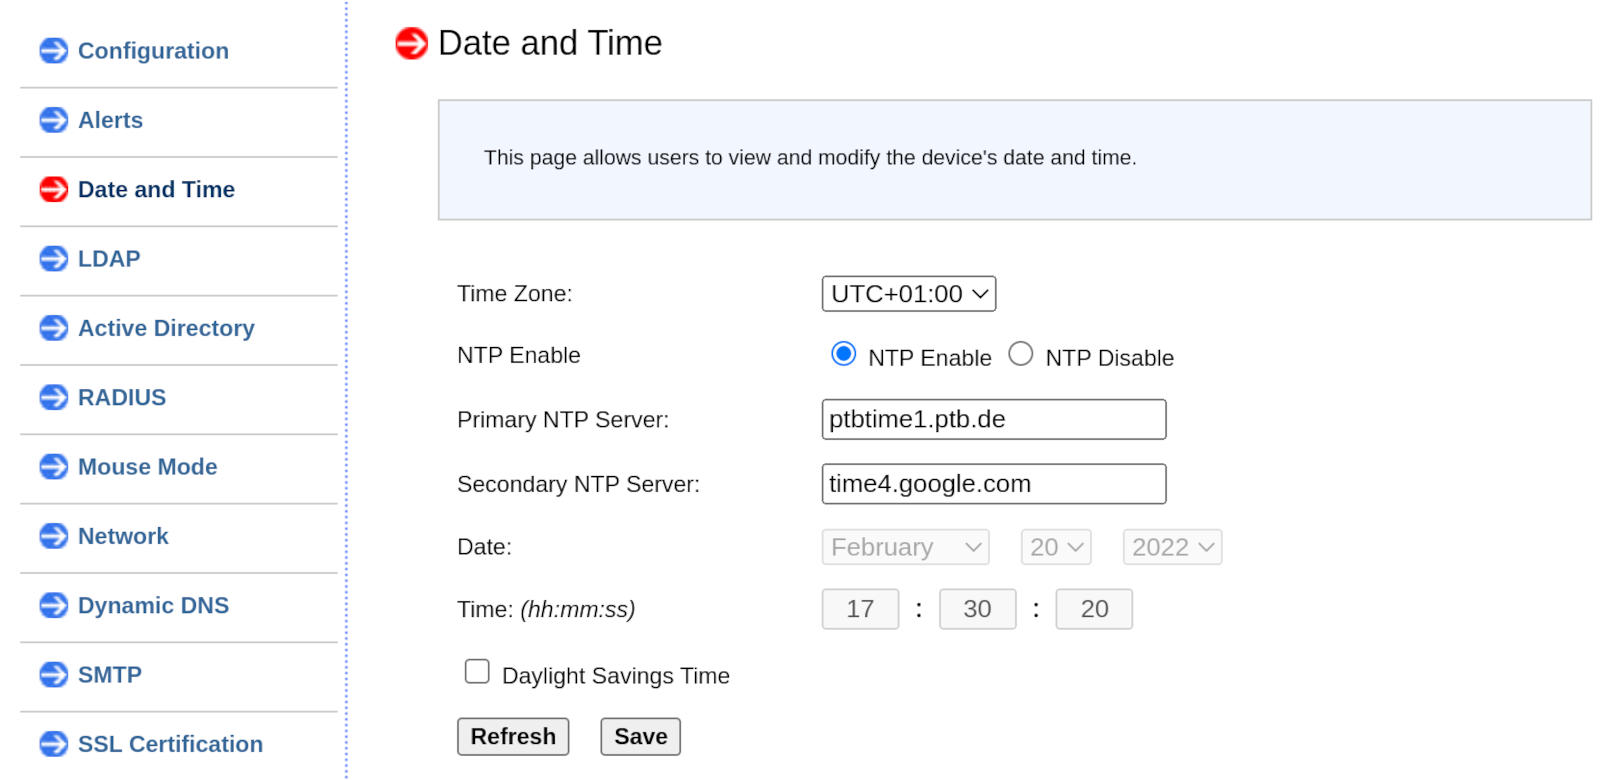
I choose the time server of the Physikalisch-Technische Bundesanstalt as primary server and one of Google’s time servers as secondary server.
Booting a live system …
using iPXE
Start by downloading the file ipxe-arch.efi from the Arch Linux Netboot
page.
Now create a floppy image with the netboot UEFI application:
mkfs.fat -C netboot.img 1440
mount netboot.img /mnt
mkdir -p /mnt/EFI/BOOT
cp ipxe-arch.16e24bec1a7c.efi /mnt/EFI/BOOT/BOOTX64.EFI
Now go to the BMC web interface and upload the floppy image under Virtual Media
-> Floppy Disk.
Then click Upload and confirm the dialog.
Upon the next boot hit F11 when prompted to select the boot device.
A new entry named UEFI: ATEN Virtual Floppy 3000 should appear.
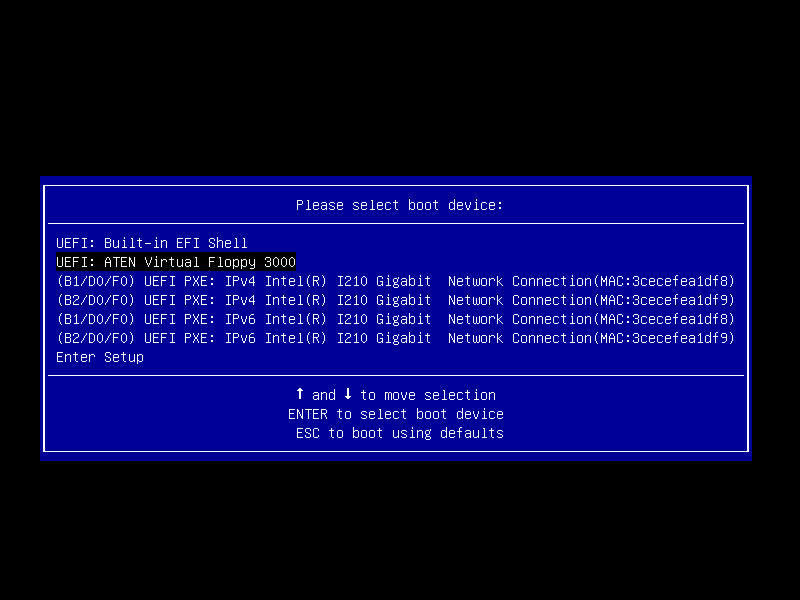
Make sure another LAN port than the dedicated BMC LAN port is connected and boot from the floppy. Now iPXE should load and boot Arch Linux.
using an ISO image
If you do not want to use Netboot, like with a rate limited internet connection
you can also mount an ISO image from a samba share.
Simply download the ISO image from the official download page and make the
ISO image available on a samba share.
Then login to the BMC web interface and go to Virtual Media -> CD-ROM Image.
Now fill out the form with the data for your ISO image:
| Field | Content |
|---|---|
Share Host |
The IP address of your samba server. |
Path to Image |
\<share-name>\<path-to-iso> |
User (optional) |
The name of the user that can access the share. |
Password (optional) |
The password of the user. |
Now first press Save, then Mount.
If you get
Oops! Something went wrong. Could not perform the operation
check the samba log. If there is
ntlm_password_check: LM password and LMv2 failed for user
, and NT MD4 password in LM field not permitted
then temporarily add
ntlm auth = Yes
client ntlmv2 auth = Yes
to the samba configuration and reload the service with systemctl reload smb.
In case the operation fails with
No protocol supported !
in the samba log file, then lower the minimum protocol version by adding
min protocol = NT1
to the sambda configuration.
Enrolling the keys
Backing up existing keys
Setup a SSH connection to the live system to backup already existing keys and transfer the keys created before onto the machine. SSHD should already be configured and running in the live system. This can by verified by first checking that the root user can login with
grep 'PermitRootLogin' /etc/ssh/sshd_config
The line PermitRootLogin yes should be outputted.
Then check that SSHD is running with
systemctl status sshd
Now set a password for the root user by calling passwd and grab the ip
address of the live system with ip address.
Finally connect to the live system with
ssh -o 'StrictHostKeyChecking=no' -o "UserKnownHostsFile=/dev/null" root@<ip-address>
Inside the live system install the packages efitools and sbsigntools:
pacman -Syu
pacman -S efitools sbsigntools
Then call efi-readvar.
On a new board no keys should be setup and the output should look like
Variable PK has no entries
Variable KEK has no entries
Variable db has no entries
Variable dbx has no entries
Variable MokList has no entries
If there are any existing keys, better back them up with
efi-readvar -v PK -o old_PK.esl
efi-readvar -v KEK -o old_KEK.esl
efi-readvar -v db -o old_db.esl
efi-readvar -v dbx -o old_dbx.esl
and transfer them to another machine using scp:
scp -o 'StrictHostKeyChecking=no' -o "UserKnownHostsFile=/dev/null" 'root@<ip-address>:/root/old_*.esl' efivar_backup/
Enroll the keys in the firmware
First transfer the *,auth files to the live system with
Transfer the .auth files to the server:
scp -o 'StrictHostKeyChecking=no' -o "UserKnownHostsFile=/dev/null" *.auth root@<ip-address>:/root/
Now on the live system place them in the correct location for the tool
sbkeysync from the sbsigntools package:
mkdir -p /etc/secureboot/keys/{db,dbx,KEK,PK}
cp /root/PK.auth /etc/secureboot/keys/PK/PK.auth
cp /root/KEK.auth /etc/secureboot/keys/KEK/KEK.auth
cp /root/db.auth /etc/secureboot/keys/db
Then perform a dry-run of the enrollment:
sbkeysync --pk --dry-run --verbose
Verify that all of the certificates are listed and no empty authentication header was created by accident. The result should be similar to
Filesystem keystore:
  /etc/secureboot/keys/db/db.auth [3481 bytes]
  /etc/secureboot/keys/KEK/KEK.auth [3486 bytes]
  /etc/secureboot/keys/PK/PK.auth [3484 bytes]
firmware keys:
  PK:
  KEK:
  db:
  dbx:
filesystem keys:
  PK:
    /C=DE/CN=PK CA 2022/O=kalehmann
     from /etc/secureboot/keys/PK/PK.auth
  KEK:
    /C=DE/CN=KEK CA 2022/O=kalehmann
     from /etc/secureboot/keys/KEK/KEK.auth
  db:
    /C=DE/CN=DB 2022/O=kalehmann
     from /etc/secureboot/keys/db/db.auth
  dbx:
New keys in filesystem:
 /etc/secureboot/keys/db/db.auth
 /etc/secureboot/keys/KEK/KEK.auth
 /etc/secureboot/keys/PK/PK.auth
After that enroll the KEK and db variables
sbkeysync --verbose
and finally the PK variable
sbkeysync --verbose --pk
The result can be checked by calling efi-readvar again.
Install the operating system from a signed installation medium
While the keys are now enrolled secure boot is still disabled.
Reboot the system and press DEL when prompted to enter the setup.
Navigate to Security -> Secure Boot and set Secure Boot to Enabled.
After that navigate to Save & Exit and hit Save Changes and Reset.
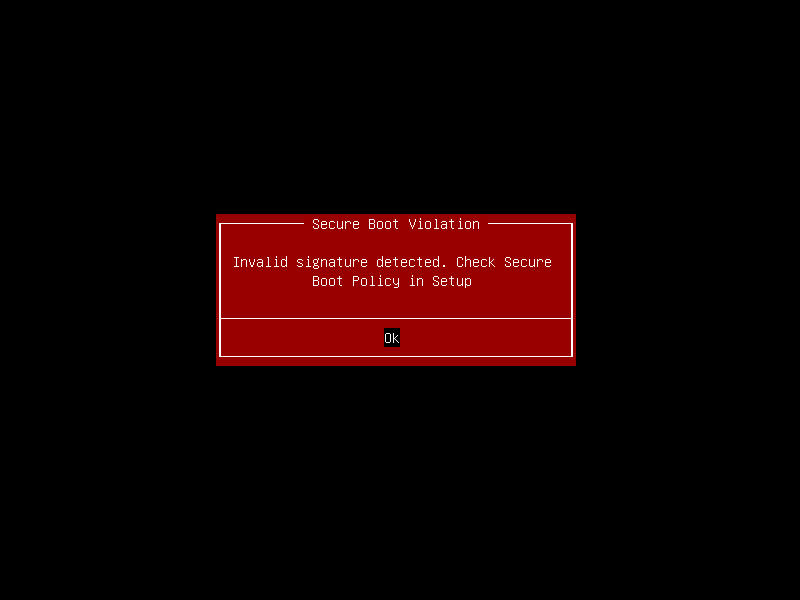
Booting an unsigned application or image should now fail.
Using iPXE
First sign the Arch Linux Netboot UEFI application with a key from the signature database:
sbsign --key db.key --cert db.crt --output ipxe-arch.signed.efi ipxe-arch.16e24bec1a7c.efi
and create another floppy image:
mkfs.fat -C netboot.signed.img 1440
mount netboot.signed.img /mnt
mkdir -p /mnt/EFI/BOOT/
cp ipxe-arch.signed.efi /mnt/EFI/BOOT/BOOTX64.EFI
umount /mnt
You can now boot iPXE, but will not be able to boot a kernel from an official mirror because they are not signed.
To sign the kernel first download the necessary files from are mirror of your choice and create a iPXE script that loads all components. In the following the mirror of the University of Technology Chemnitz is used:
VERSION="2022.02.01"
rsync -av rsync://ftp.tu-chemnitz.de/ftp/pub/linux/archlinux/iso/${VERSION}/arch/boot/ .
PUB_IP="$(ip route get 8.8.8.8 | grep -oP 'src \K[^ ]+')"
cat << EOF > script.ipxe
#!ipxe
kernel http://${PUB_IP}:8000/x86_64/vmlinuz-linux
initrd http://${PUB_IP}:8000/intel-ucode.img
initrd http://${PUB_IP}:8000/x86_64/initramfs-linux.img
imgargs vmlinuz-linux initrd=intel-ucode.img initrd=initramfs-linux.img archiso_http_srv=http://ftp.tu-chemnitz.de/pub/linux/archlinux/iso/${VERSION}/ archisobasedir=arch verify=y ip=dhcp net.ifnames=0 BOOTIF=01-\${netX/mac}
boot
EOF
Then sign the kernel with
sbsign --key /path/to/db.key --cert /path/to/db.crt --output x86_64/vmlinuz-linux x86_64/vmlinuz-linux
Now start a web server on port 8000 serving the current directory:
python -m http.server
After that boot the signed iPXE UEFI application as described before
and select Drop to iPXE shell.
There first allow untrusted images by executing imgtrust --allow.
Warning: Only proceed in a trusted network. A potential attacker can now manipulate the microcode and initial ramdisk images as they are transferred without any notice.
Then chain the iPXE script from above:
chain http://{your-ip}:8000/script.ipxe
Using a remastered ISO image
If one cannot or does not want to use netboot, there is the option to create a remastered installation medium with a signed bootloader and kernel.
First install the archiso package:
pacman -S archiso
Now create a custom profile based on the standard releng profile:
mkdir /tmp/{out_dir,profile_dir,work_dir}
cp -r /usr/share/archiso/configs/releng/* /tmp/profile_dir/
Then edit the profile and change the bootmode to systemd-boot, since that
bootloader is the easiest to sign in a pacman hook.
Do so by editing /tmp/profile_dir/profiledef.sh and replace the bootmodes with
bootmodes=('uefi-x64.systemd-boot.esp' 'uefi-x64.systemd-boot.eltorito')
After that create the pacman hook that triggers after an installation of the kernel and signs the kernel as well as the systemd-boot bootloader:
cat << EOF > /tmp/profile_dir/airootfs/etc/pacman.d/hooks/99-sign.hook
# remove from airootfs!

[Trigger]
Operation = Install
Target = usr/lib/modules/*/vmlinuz
Target = usr/lib/initcpio/*
Type = Path

[Action]
Description = Sign the bootloader and kernel
When = PostTransaction
Depends = sh
Depends = sbsigntools
Exec = /bin/sh /usr/local/bin/sign-kernel
EOF
and
cat << EOF > /tmp/profile_dir/airootfs/usr/local/bin/sign-kernel
#! /bin/sh

/usr/bin/sbsign --key /root/db.key --cert /root/db.crt --output /usr/lib/systemd/boot/efi/systemd-bootx64.efi /usr/lib/systemd/boot/efi/systemd-bootx64.efi
/usr/bin/sbsign --key /root/db.key --cert /root/db.crt --output /boot/vmlinuz-linux /boot/vmlinuz-linux
rm -v /root/db.crt
rm -v /root/db.key
EOF
Next add the sbsigntools package to the installation medium:
echo sbsigntools >> /tmp/profile_dir/packages.x86_64
After that move the signature database key and certificate to the profile
cp /path/to/uefi-keys/db.{crt,key} /tmp/profile_dir/airootfs/root
and then create the ISO file with
mkarchiso -v -w /tmp/work_dir -o /tmp/out_dir /tmp/profile_dir
The ISO image should be located in /tmp/out_dir and can now be booted
as described above.
Installation process
The installation process is already covered in the Arch Linux Installation Guide. Before the installation the secure boot status can be checked with the command mokutil from the package with the same name by running
mokutil --sb-state
Automatically sign the kernel after updates
Without any additional configuration the system would refuse to boot the new
kernel after an update because it is still unsigned.
There is a tool called sbupdate, that provides a pacman hook to
automatically create a unified kernel image signed with custom secure boot
keys.
It is available in the Arch User Repository as sbupdate-git.
After the installation of sbupdate, the signature database key and
certificate needs to be copied to the directory /etc/efi-keys.
The recommended way to do this is using scp:
scp -o 'StrictHostKeyChecking=no' -o "UserKnownHostsFile=/dev/null" db.{key,crt} root@<ip-address>:/mnt/etc/efi-keys/
Note: the tool sbupadte assumes the signature database key and
certificate names to be db.key and db.crt (uppercase, e.g. DB.key is also
allowed).
The signature database key should be only accessible by the root user:
chown -R root:root /etc/efi-keys
chmod 500 /etc/efi-keys
chmod 400 /etc/efi-keys/*
Now edit /etc/sbupdate.conf, uncomment the line with the CMDLINE_DEFAULT key
and add your required kernel command line parameters, for example the root
file system.
For all the other keys the default values should be sufficient.
After that reinstall the kernel to check the configuration and create the signed image:
pacman -S linux # or linux-lts
Finally create a boot entry for the signed kernel image using efibootmgr:
efibootmgr --disk /dev/nvme0n1 --part 1 --create --label "Arch Linux" --loader /EFI/Arch/linux-lts-signed.efi --verbose
Adapt --disk and --part for your system.