ESP8266 Signed OTA updates from continuous integration
#Coding#MakeThe ESP8266 is an inexpensive microcontroller with Wi-Fi capabilities. It is really popular with makers, because with its great community and integration for many SDKs, it enables them to expose sensor data to the network for cheap. A great variety of boards with this chip in different form factors and with additional features like a USB-controller for programming have been developed and are being sold.
Hacking a demo together with the ESP8266 is easy and fast as the chip is well-supported by the Arduino ecosystem and there is even a MicroPython fork for it. With a large community, many beginner questions will be resolved after a quick search on the internet.
However, making a professional appliance with the ESP8266 is harder. When using the chip in a production like setup, for example soldered into a circuit in a remote place, the board cannot easily be connected to a PC by wire every time the code changes. Furthermore, as the code may be published to some public version control platform, hard coding Wi-Fi credentials is not an option anymore.
This post will describe all the various steps to set up automated and secure updates of the ESP8266 and provide common code snippets that can be reused in ESP8266 projects.
Avoiding hard coded WiFi credentials
Hard coded credentials, like a Wi-Fi password in the firmware, should be avoided. They require the device to be reprogrammed on configuration changes. Additionally, the source code or a binary firmware with hard coded credentials can not be shared easily as sensitive information could be leaked.
Therefore, it is strongly recommended to avoid hard coding credentials or sensitive configuration for the ESP8266.
The ESP8266 then provides several ways to permanently store data in the flash memory, the two most popular ones are EEPROM emulation for storing binary data in the flash memory and based on this multiple APIs for file system like access to the flash memory..
Gathering the credentials at runtime can happen in multiple ways, for example by reading commands over a serial connection. If only the Wi-Fi credentials need to be stored, there is no need to bother with the EEPROM emulation, as the Arduino core for the ESP8266 already has a way to persist the Wi-Fi credentials:
#include <string.h>
#include <ESP8266WiFi.h>

void queryParameter(const char * const name, char * const buffer, size_t size)
{
        char c = 0;
        size_t length;

        do {
                length = 0;
                memset(buffer, 0, size);
                Serial.printf("Please enter the %s \r\n> ", name);
                do {
                        while (!Serial.available()) delay(100);
                        c = Serial.read();
                        if ('\n' == c || '\r' == c) {
                                c = 0;
                                Serial.print("\r\n");
                        } else {
                                buffer[length++] = c;
                                Serial.printf("%c", c);
                        }
                } while (c && length < size -1);
        } while (buffer[0] == 0);
}

bool checkWiFi(void)
{
        unsigned int connection_timeout = 5 * 10;
        while (WiFi.status() != WL_CONNECTED && --connection_timeout) {
                delay(100);
        }

        return WiFi.status() == WL_CONNECTED;
}

void connectToNewWiFi() {
        char ssid[33], password[65];

        while (true) {
                queryParameter("SSID", ssid, 33);
                queryParameter("password", password, 65);

                WiFi.begin(ssid, password);

                if (checkWiFi()) return;

                Serial.printf("Could not connect to network \"%s\". "
                              "Please try again\r\n", ssid);
        }
}

void setupWiFi() {
        WiFi.persistent(true);
        WiFi.begin();
        if (!checkWiFi()) {
                Serial.println("Could not connect to saved WiFi network");
                connectToNewWiFi();
        }
        Serial.println("Connected to WiFi network");
}

void setup(void) {
        Serial.begin(9600);
        setupWiFi();
}

void loop(void) {}
There are also libraries that handle more complex cases. A notable example is the WiFiManager library, that sets up an access point with a web interface to configure the Wi-Fi. It can easily be extended for additional parameters and is as easy to use as
#include <WiFiManager.h>

void setup(void) {
        WiFiManager wifiManager;
        wifiManager.autoConnect();
}

void loop(void) {}
HTTPs on the ESP8266
Now, with a working Wi-Fi connection, let’s talk about communication with servers. The ESP8266 can establish secure connections using HTTPS.
When a request to an encrypted website - using HTTP over TLS (HTTPS) - is made, the web server provides a TLS certificate. This TLS certificate contains a public key and information about the certificate itself, including when it will expire and for which domain name - also called Common Name - it was issued.
The client can then use the certificate to verify the identity of the server. First it has to check that the certificate has not expired yet and whether the common name matches the host the request was made against. But now anyone can create a certificate with any common name and expiry date.
How does the client know which certificate can be trusted?
The client can store a list of trustworthy certificates. But storing the certificate of a server itself is impractical, as these certificates are frequently changed and therefore expire after a short time. For example, Let’s Encrypt certificates expire after 90 days.
Fortunately, certificates are usually signed by other certificates, which may themselves be signed by other certificates again. This list of signatures is called a certificate chain, and the certificate on top of the certificate chain is a long-living, so-called Root certificate.
The owner of the root certificate should be a trusted authority and guarantee,
that all certificates signed by the root certificates can be trusted.
Hence, in order to verify the certificate of a web server, a set of trustworthy
root certificates must be obtained.
In Linux distributions, this set of root certificates is usually
packaged under the
name ca-certificates.
The Arduino core for the ESP8266 provides a little tool to fetch
the fingerprint of the certificate as well as all public keys in the
certificate chain for a host - including the root certificate - and write them
into a header file.
Let’s assume, a secure request against wttr.in - a handy tool to
get an ASCII weather report - shall be performed.
First, the certificates are written into a header file with
python3 cert.py -s wttr.in -n wttr_in > cert_wttr_in.h
At the time this post is written, wttr.in uses Let’s Encrypt, so the ESP8266 needs the ISRG Root X1 as trusted root certificate.
Furthermore, the EPS8266 needs the current date to check if the server’s
certificate is still valid.
In ESP8266 core lives an
undocumented function called configTime
to easily set NTP servers.
Now the time is fetched asynchronously in the background.
To avoid race conditions, the program could wait until time(nullptr)
returns a value other than the start of the Unix epoch.
Then a secure request is performed with
#include <ESP8266HTTPClient.h>
#include <WiFiClientSecureBearSSL.h>
#include <time.h>
#include <TZ.h>

#include "cert_wttr_in.h"

BearSSL::WiFiClientSecure client;
BearSSL::X509List trustedRoots(cert_ISRG_Root_X1);

void requestWeather() {
        HTTPClient httpClient;
        int resp;

        httpClient.begin(client, "https://wttr.in/Dresden?0QT");
        httpClient.setUserAgent("curl");
        resp = httpClient.GET();
        if (resp >= 400) {
                Serial.print("Server response ");
                Serial.println(resp);
        } else if (resp > 0) {
                Serial.print(httpClient.getString());
        } else {
                Serial.println(httpClient.errorToString(resp));
        }

        httpClient.end();
}

void setupSecureClient() {
        configTime(TZ_Europe_Berlin, "pool.ntp.org", "time.nist.gov");
        while (time(nullptr) < 3600 * 24 * 365) {
                delay(500);
        }
        client.setTrustAnchors(&trustedRoots);
}

void setup() {
        Serial.begin(9600);
        setupWiFi();
        setupSecureClient();
}

void loop() {
        requestWeather();
        delay(10000);
}
OTA Updates
The Arduino core for the ESP8266 already has well documented Over-The-Air update capabilities including signature verification and HTTP “Basic” authentication.
Signing Updates
The Updater class of the Arduino core for the ESP8266 supports the
verification of a signed cryptographic hash, which is appended to the update.
To sign the update, the binary firmware has to be acquired first. Normally, when uploading a sketch to the board, the binary firmware is stored onto the disk in some temporary folder hidden from the user. The common tools used to build and flash the firmware onto the board still provide ways to export the binary:
- The Arduino cli will export the binary with
arduino-cli compile \
    --build-property compiler.cpp.extra_flags='-DMY_FLAG' \
     --export-binaries \
    --fqbn=esp8266:esp8266:nodemcuv2 \
    <my-sketch>.ino
to
build/esp8266.esp8266.nodemcuv2/<my-sketch>.ino.bin - PlatformIO Core will write binaries to
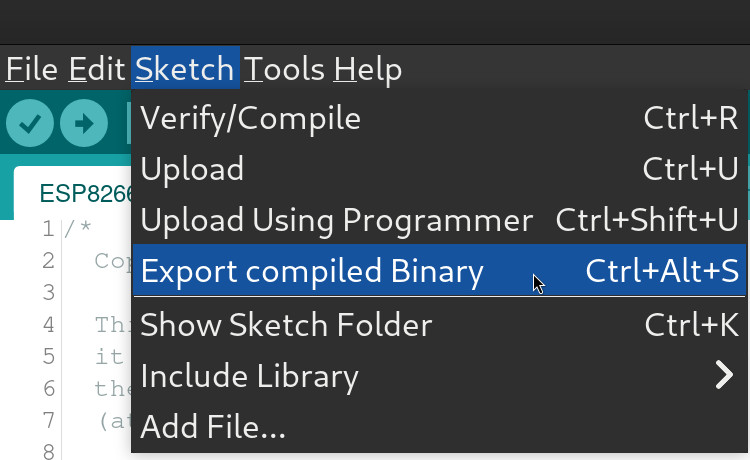
.pio/build/nodemcuv2/firmware.bin. - The legacy Arduino IDE (v1.x) has the option to export binaries into the
sketch folder.
Now a signed update consists of three parts:
Signing the binary requires an RSA-2048 key pair in PEM format. This pair can be created with OpenSSL using
openssl genrsa -out private.key 2048
openssl rsa -in private.key -outform PEM -pubout -out public.key
With the private key and OpenSSL, a signature for any file can be created with
openssl dgst \
    -binary \
    -out firmware.bin.signature \
    -sha256 \
    -sign private.key \
    firmware.bin
Now the length of the signature can be encoded with a bit of python code, where
<L is the format string for an unsigned, 4 byte little endian integer:
import struct, sys
length = struct.pack('<L', len(sys.stdin.buffer.read()))
sys.stdout.buffer.write(length)
Finally packing it all together to sign the firmware manually
openssl dgst \
    -binary \
    -sha256 \
    -sign private.key \
    firmware.bin | tee --append firmware.bin | python3 -c "
import struct,sys
sys.stdout.buffer.write(struct.pack('<L', len(sys.stdin.buffer.read())))" >> firmware.bin
Now the Arduino core for the ESP8266 already comes with the signing tool to sign a binary without all these manual steps:
python3 signing.py \
    --bin firmware.bin \
    --mode sign \
    --out firmware.signed.bin \
    --privatekey private.key \
    --publickey public.key
To push or to pull?
When doing an OTA update, the ESP8266 can either pull the new code from a server or have the update pushed from another system. Pushing updates implies exposing the ESP to the system deploying the updates. This post covers providing OTA updates from within a Continuous Integration pipeline. There are two problems with pushing updates to an IOT device:
- Generally, CI runners are not hosted at home, but somewhere on the internet. So pushing updates from the CI server to the ESP8266 means exposing the board to the internet. Depending on your network design, this may require serious effort, for example exposing the ESP behind a carrier-grade NAT.
- As you may already know, the S in IOT stands for security, and exposing your (homemade) IOT device over the internet may not be the best idea.
Therefore, letting the board periodically check for updates from a server seems to be the way to go.
Serving OTA updates
The ESP8266 core already provides a library that can query a server for updates. A request from that library to update endpoints looks like
GET /update.php HTTP/1.0
Host: <My-Server>
User-Agent: ESP8266-http-Update
Connection: close
x-ESP8266-Chip-ID: XXXXXXXX
x-ESP8266-STA-MAC: 18:FE:AA:BB:CC:DD
x-ESP8266-AP-MAC: 1A:FE:11:22:33:44
x-ESP8266-free-space: 655360
x-ESP8266-sketch-size: 304544
x-ESP8266-sketch-md5: 24d2538f20eef9120eb1c16f8181951a
x-ESP8266-chip-size: 4194304
x-ESP8266-sdk-version: 2.2.2-dev(38a443e)
x-ESP8266-mode: sketch
x-ESP8266-version: 0.0.1
Content-Length: 0
The server hosting the update can use the x-ESP8266-sketch-md5 and
x-ESP8266-version headers to determine if any newer firmware is available.
It should be noted, that the x-ESP8266-sketch-md5 header always contains
the hash of the unsigned firmware, even if the ESP8266 was updated with a signed
firmware.
Also, the MAC address can be used to provide different versions to
different boards, for example to deploy multiple configurations.
The server uses the HTTP response code 304 to indicate, that no
newer firmware is available yet.
An example for the server code in PHP, which expects (simple) semantic versioning and provides the update only if either the version hosted on the server is newer than the currently deployed version or if the hashes differ for the same version is
<?php

declare(strict_types=1);

$firmwareVersion = file_get_contents(__DIR__ . '/version.txt');

function respond(string $body, int $code = 200, array $headers = []): never
{
    $headers['Content-Length'] = (string)strlen($body);
    foreach ($headers as $name => $value) {
        header(header: $name.': '.$value, response_code: $code);
    }
    print($body);
    exit();
}

function sendFile(string $body, string $name): never
{
    $headers['Content-Disposition'] = 'attachment; filename='.$name;
    $headers['Content-Type'] = 'application/octet-stream';
    $headers['x-MD5'] = md5($body);
    respond($body, 200, $headers);
}

function firmwareMd5(string $firmware): string
{
    [0 => $padding] = unpack('V', $update, substr($update,  -4));

    return md5(substr($update, 0, -1 * $padding - 4));
}

$firmware = file_get_contents(__DIR__ . '/firmware.bin');
$deployedVersion = $_SERVER['HTTP_X_ESP8266_VERSION'] ?? false;

if (!$deployedVersion) {
    sendFile($firmware, 'firmware.bin');
} elseif (version_compare($firmwareVersion, $deployedVersion, '==')) {
    $deployedHash = $_SERVER['HTTP_X_ESP8266_SKETCH_MD5'] ?? false;
    if (firmwareMd5($update) !== $deployedHash) {
        sendFile($firmware, 'firmware.bin');
    }
} elseif (version_compare($firmwareVersion, $deployedVersion, '>=')) {
    sendFile($firmware, 'firmware.bin');
}

respond('No update available', 304);
Pulling signed OTA updates over HTTPs
The code to let the ESP8266 pull an update from a server is simple.
First, the ESP8266 needs the public key to verify the signature of the update.
Add a new file ota_key.h to the sketch, that will hold the key:
#ifndef OTA_KEY_H_
#define OTA_KEY_H_

// Uncomment and adapt the following lines to accept only signed updates.
/*
#define WITH_SIGNATURE_VERIFICATION
const char * const signing_key = R"(-----BEGIN PUBLIC KEY-----
...
-----END PUBLIC KEY-----)";
*/
#endif
First let the ESP8266 connect to a WiFi network and the setup the ESP8266httpUpdate class to query a server periodically for updates.
#include <ESP8266httpUpdate.h>
#include "ota_key.h"

#ifndef OTA_URL
#define OTA_URL NULL
#endif
const char * const ota_url = OTA_URL;

#ifndef OTA_VERSION
#define OTA_VERSION ""
#endif
const char * const ota_version = OTA_VERSION;

#ifdef WITH_SIGNATURE_VERIFICATION
BearSSL::PublicKey signPubKey{signing_key};
BearSSL::HashSHA256 hash;
BearSSL::SigningVerifier sign{&signPubKey};
#endif

void setup() {
        Serial.begin(9600);
        connectToWifi();
#ifdef WITH_SIGNATURE_VERIFICATION
        Update.installSignature(&hash, &sign);
#endif
        ESPhttpUpdate.onStart([]() {
                Serial.println("Checking for updates");
        });
        ESPhttpUpdate.onProgress([](int progress, int total) {
                Serial.printf("Update progress: %d / %d bytes written (%d%%)\n",
                              progress, total, progress / (total / 100));
        });
        ESPhttpUpdate.onError([](int error) {
                switch (error) {
                case HTTP_UPDATE_FAILED:
                        Serial.println("OTA update failed");
                        break;
                case HTTP_UPDATE_NO_UPDATES:
                        Serial.println("No updates available");
                        break;
                default:
                        Serial.print("OTA update failed with ");
                        Serial.println(ESPhttpUpdate.getLastErrorString());
                }
        });
}

void loop() {
        if (ota_url) {
                ESPhttpUpdate.update(client, ota_url, ota_version);
        }
}
Define a CD pipeline
With all the previous steps, the ESP8266 is able to fetch signed updates over a secure channel. Now signing the updates by hand, uploading them somewhere and keeping track of version numbers are stupid and repetitive tasks. Let’s set up a pipeline for continuous deployment.
Of course, the actual definition of the pipeline depends on the CI/CD platform that is used. In the following, Woodpecker CI is used, but the details should be similar for most other platforms.
The pipeline will build to code at every commit to verify that the project structure is still intact, and the compiler can make sense out of every change. However, signing and uploading the signed firmware only happens when a tag gets pushed.
CI platforms usually run codes inside Docker images.
Let’s assume there is a Docker image with PlatformIO Core set up
and the framework-arduinoespressif8266 package for PlatformIO installed hosted
at git.kalehmann.de (the public DNS entry is only disguise, don’t even try).
The configuration for PlatformIO contains
[env:nodemcuv2]
platform = espressif8266
board = nodemcuv2
build_flags=
    '-D OTA_VERSION="${sysenv.OTA_VERSION}"'
    '-D OTA_URL="${sysenv.OTA_URL}"'
framework = arduino
The first step would be to fetch the certificate of the target host, which will
contain OTA updates.
That requires to know the URL where the updates will be placed.
As the updater URL may be different when somebody forks the repository, it will
not be hard coded, but is instead defined as a parameter to the pipeline.
Woodpecker CI calls these parameters “secrets”.
This step uses a secret called ota_url:
steps:
    - name: 'Fetch the certificate'
      image: 'git.kalehmann.de/platformio:latest'
      commands:
          - 'ESP_CORE=~/.platformio/packages/framework-arduinoespressif8266'
          - |
              python "$${ESP_CORE}/tools/cert.py" \
                  -s $(echo $${OTA_URL} | cut -d '/' -f 3) \
                  -n ota_url > src/cert_ota_url.h
      secrets:
          - 'ota_url'
The next step includes defining the public key used for the signature
verification of the firmware, the version of the firmware as well as
the updater URL and building the firmware.
The version of the firmware is read from the environment variable
CI_COMMIT_TAG that is defined by Woodpecker CI.
The other two values are read from secrets.
Since Woodpecker CI has issues with preserving newlines in secrets,
SIGN_PUBLIC_KEY contains the key base64 encoded with
base64 --wrap=0 public.key
steps:
    - name: 'Fetch the certificate'
      ...
    - name: 'Build the firmware'
      image: 'git.kalehmann.de/platformio:latest'
      commands:
          - 'PUBLIC_KEY=$(echo $${SIGN_PUBLIC_KEY} | base64 -d)'
          - |
              cat <<EOF > src/ota_key.h
              #ifndef OTA_KEY_H_
              #define OTA_KEY_H_

              #define WITH_SIGNATURE_VERIFICATION
              const char * const signing_key = R"($${PUBLIC_KEY})";

              #endif
              EOF
          - 'export OTA_VERSION="$${CI_COMMIT_TAG}"'
          - 'pio run'
      depends_on:
          - 'Fetch the certificate'
      secrets:
          - 'ota_url'
          - 'sign_public_key'
When building the firmware, PlatformIO stores the binary firmware as
.pio/build/nodemcuv2/firmware.bin inside the current working directory.
The next step will use another secret SIGN_PRIVATE_KEY.
That secret contains the base64 encoded private key, that is used to cryptographically
sign the firmware.
steps:
    - name: 'Fetch the certificate'
      ...
    - name: 'Build the firmware'
      ...
    - name: 'Sign the firmware'
      image: 'git.kalehmann.de/platformio:latest'
      commands:
          - |
              echo $${SIGN_PRIVATE_KEY} \
              | base64 -d \
              | openssl dgst \
                  -binary \
                  -sha256 \
                  -sign /dev/stdin \
                  .pio/build/nodemcuv2/firmware.bin \
              | tee --append .pio/build/nodemcuv2/firmware.bin \
              | python <<EOF >> .pio/build/nodemcuv2/firmware.bin
              import struct, sys
              length = struct.pack('<L', len(sys.stdin.buffer.read()))
              sys.stdout.buffer.write(length)
              EOF
      secrets:
          - 'sign_private_key'
      depends_on:
          - 'Build the firmware'
      when:
          event:
              - 'tag'
Finally, the signed firmware has to be uploaded to the target host.
The next step uses another image hosted on git.kalehmann.de which has lftp
installed.
As all the information needed to connect to the target host in sensitive, there
are four more secrets ftp_password, ftp_port, ftp_server and ftp_user
introduced:
steps:
    - name: 'Fetch the certificate'
      ...
    - name: 'Build the firmware'
      ...
    - name: 'Sign the firmware'
      ...
    - name: 'Upload the firmware'
      image: 'git.kalehmann.de/lftp:latest'
      commands:
          - 'echo $${CI_COMMIT_TAG} > version.txt'
          - 'lftp -e "
              set sftp:auto-confirm yes;
              set ftp:ssl-force true;
              set ftp:ssl-protect-data true;
              set ssl:verify-certificate yes;
              open
                  -p $${FTP_PORT}
                  -u $${FTP_USER},$${FTP_PASSWORD}
                  sftp://$${FTP_SERVER};
              mkdir -p esp8266citest;
              put -O esp8266citest $(pwd)/updater.php;
              put -O esp8266citest $(pwd)/version.txt;
              put -O esp8266citest $(pwd)/.pio/build/nodemcuv2/firmware.bin;
              exit;"'
      secrets:
          - 'ftp_password'
          - 'ftp_port'
          - 'ftp_server'
          - 'ftp_user'
      depends_on:
          - 'Sign the firmware'
      when:
          event:
              - 'tag'
Conclusion
Most of the snippets provided above contain just boilerplate code, that can be smoothly added and adapted to new or existing projects. Having a continuous and secure roll out of code changes significantly reduces the effort required to roll out code changes and test them on real hardware. Besides keeping secrets and configuration out of the code and the repository facilitates sharing the code.